I love Meshuggah and Tomas Haake. So as soon as I heard this song, I told myself I had to cover it. In order to cover a song this complicated, I have to transcribe it first so I understand what’s going on. Lucky for you, you can now find that transcription on my transcriptions page! Anyway, I hope you enjoy this one. It’s quite the toughie, but it’s a lot of fun to play. This is my first Meshuggah cover, so now that I’ve broken the ice I definitely plan to begin doing more.
For this recording, I’m using a set of CAD Touring 7 tom and overhead mics as well as an Audix D6 on the bass drum and an Audix D5 on the snare. I’m not using a trigger on the kick, so you may hear me get a bit ahead or behind the beat on some of the long double bass sections. I’m using a custom drum set made of Keller drum shells and Pearl lugs and rims. I worked with the maestros at Columbus Pro Percussion in Columbus, Ohio to build this set. For cymbals, I’m using pair of 14″ Meinl Byzance Dark Hats on my left, a Meinl 16″ Byzance Medium Crash on my left, a Meinl 18″ Benny Greb Signature Byzance Sand Medium Crash on my right, a pair of 13″ Meinl Byzance Brillant Fast Hats on my right, and an 18″ Paiste Signature Thin China on my right.
Please follow along with the notation, available on the Transcriptions page.
VIDEO INDEX:
1:07 – Section A
1:32 – Section A Example
2:03 – Sections B & C
2:44 – Sections B & C Example
3:36 – Section D
3:53 – Section D Example
4:25 – Sections H & I
5:37 – Sections H & I Example
6:29 – Section J
7:01 – Section J Example
7:46 – Section K
8:27 – Section K Example
9:16 – Conclusion
If you have questions about this song or have requests for future lessons, please say so in the comment section.
I love The Faceless. In fact, this is the second time I have covered one of their songs. Not only does this song have some tricky timing, the tempo is ridiculous. I haven’t played double bass this fast in a while (if ever), so I really had to keep after it. I worked up quite a sweat, so at the halfway point you’ll see me ripping off a blister that developed while playing!
For this recording, I’m using a set of CAD Touring 7 tom and overhead mics as well as an Audix D6 on the bass drum and an Audix D5 on the snare. I’m not using a trigger on the kick, so you may hear me get a bit ahead or behind the beat on some of the long double bass sections. I’m using a custom drum set made of Keller drum shells and Pearl lugs and rims. I worked with the maestros at Columbus Pro Percussion in Columbus, Ohio to build this set. For cymbals, I’m using pair of 14″ Meinl Byzance Dark Hats on my left, a Meinl 16″ Byzance Medium Crash on my left, a Meinl 18″ Benny Greb Signature Byzance Sand Medium Crash on my right, a pair of 13″ Meinl Byzance Brillant Fast Hats on my right, a 20″ Meinl B20 Heavy Ride on my right, and an 18″ Paiste Signature Thin China on my right. I love Meinls, but I have had this Paiste china forever and I love it.
This is a cover of the song “Aftertaste” from Ellie Goulding’s 2015 album Delirium. I’m really into this album and this is one of my favorite songs from it. I didn’t intend to post a cover of this song, but I played it through a few times while recording other videos and later decided to use the footage. I didn’t play the original drum part, but hopefully it’s still entertaining and sounds good.
For equipment, I’m using a set of CAD Touring 7 tom and overhead mics as well as an Audix D6 on the bass drum and an Audix D5 on the snare. I’m using a custom drum set made of Keller drum shells and Pearl lugs and rims. I worked with the maestros at Columbus Pro Percussion in Columbus, Ohio to build this bad boy. I’m also using a Pearl Reference Brass 14 x 5 snare (my baby). For cymbals, I’m using pair of 14″ Meinl Byzance Dark Hats on my left, a Meinl 16″ Byzance Medium Crash on my left, a Meinl 18″ Benny Greb Signature Byzance Sand Medium Crash on my right, and a Meinl Byzance Dark 21″ ride. I also have a 8″ Byzance Brilliant Splash perched on top of the Sand Crash on my right.
This is a cover of the song “Strange Times” from The Black Keys’ 2008 album Attack & Release. You can grab the notation for this song on my Transcriptions page.
I love The Black Keys, so this song was a lot of fun to cover! In this song I’m using CAD Touring 7 drum mics on the toms and for overheads; I’m using an Audix D6 on the bass drum and an Audix D5 on the snare.
I’m using a custom drum set made of Keller drum shells and Pearl lugs and rims. I worked with the maestros at Columbus Pro Percussion in Columbus, Ohio to build this bad boy. For cymbals, I’m using pair of 14″ Meinl Byzance Dark Hats on my left, a Meinl 16″ Byzance Medium Crash on my left, a Meinl 18″ Benny Greb Signature Byzance Sand Medium Crash on my right, and a Meinl Byzance Dark 21″ ride.
This is one of my favorite songs from The Weeknd’s 2015 album, Beauty Behind the Madness. It’s so chill, groovy and delicate. I was feeling inspired, so I sat down and recorded this song without much preparation. The drums are minimal in the original track, so I simply decided to play what I felt like. For that reason, it’s a bit more drum-centric than the original and I took the opportunity to throw in some extra fills and stick tricks. Unfortunately, YouTube took down my original video due to copyright infringement, but the drums sound so good that I couldn’t waste the footage. For that reason, this is the “drums only” video. I hope you enjoy.
In this video I’m using CAD Touring 7 drum mics, with the exception of an Audix D6 on the bass drum and an Audix D5 on the Snare. I’m using a custom drum set made of maple Keller drum shells with Pearl lugs and rims. I worked with the maestros at Columbus Pro Percussion in Columbus, Ohio to build it. For cymbals, I’m using a pair of 14″ Meinl Byzance Dark Hats, a Meinl 16″ Byzance Medium Crash on my left, a Meinl 18″ Benny Greb Signature Byzance Sand Medium Crash on my right, and a 21″ Meinl Byzance Dark Ride.
Today we are going to talk about how to maneuver in 4/4 time. Now, if you don’t know much about time signatures, don’t worry. You probably know more about 4/4 time than you realize. In fact, if you’ve ever listened to the radio, or any popular song on iTunes, spotify, YouTube or wherever, then you’re pretty much already an expert because the vast majority of the songs that are popular western music are in 4/4.
Now, that’s great news, because if you can master this time signature, then you’ll have a head start on playing a bunch of your favorite songs and on creating popular music.
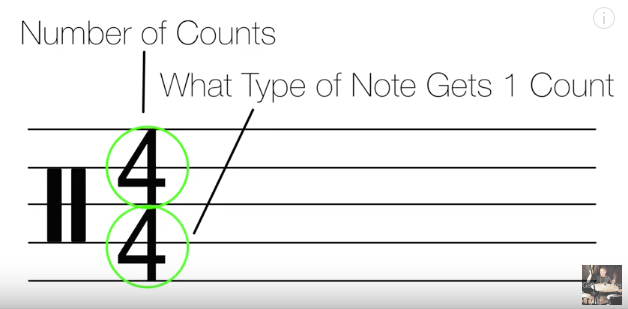
So, first lets talk about what a time signature is. If you’re reading written music, the time signature appears at the beginning of each song and it tells you two very important things:
It tells you the number of counts per measure.
It tells you what type of note gets a single count.
Let’s check out the time signature symbol for 4/4. The top number indicates the number of counts per measure, which is 4. And, the bottom number tells you the type of note that receives a single count. When I say “type” of note, I mean what note value, like quarter notes, eighth notes, whole notes, etc.
So, in 4/4 we can see that there are 4 counts per measure and that a quarter note gets a single count. What that means if you’re counting along through each 4/4 measure is that you’ll count “1, 2, 3, 4” and in the next measure, again, you’ll count “1, 2, 3, 4.” That will repeat until the end of the song or until the time signature changes. Each of those counts is a quarter note.
Let’s go over a couple of common beats and take a look at how they appear when it’s written out in 4/4.
Rock
This is a common rock beat. Throughout this beat, I played quarter notes between my snare and bass drum and eighth notes with my hi hat. So, the snare and bass drum played 1, 2, 3, 4. And the Hi hat played, 1+ 2 + 3 + 4 +.
Eighth Notes
This introduces a new method of counting for eighth notes that we haven’t seen yet. When we count quarter notes in 4/4, we say “1, 2, 3, 4.” But, because eighth notes are twice as fast as quarters (or in other words two eighth notes fit into the same amount of time as 1 quarter note), we need to add to our counting method. Now, to account for the eighth notes we’ll keep “1, 2, 3, and 4” but between each of those counts we need to add the word “and.” So, eighth notes are counted “1 + 2 + 3 + 4 +.”
Jazz
This is a very common jazz beat. In this beat, the bass drum strikes on all 4 quarter notes and the snare drum strikes on the 2nd and 4th quarter notes. In addition I also closed the hihat on the 2nd and 4th quarter and instead of playing straight eighth notes on the hihat, I switched to my ride cymbal and played quarters on counts 1 and 3 and a syncopated eighth note triplet pattern on 2 and 4.
Here’s the ride pattern by itself.
Triplets
Counting triplets is slightly different than counting quarters or eighth notes. The triplets I played were based on eighth notes, which means that 3 triplets fit into the same amount of time as 2 eighth notes. I’m not going to go into too much detail in this lesson, but to count these, you would say “1 triplet, 2 triplet, 3 triplet, 4 triplet.” Or, I’ve also heard “1 + a, 2 + a, 3 + a, 4 + a.”
Funk
Last, this beat is one of the best known funk beats of all time: the Funky Drummer beat. Here, the bass drum is playing 1 +, and then strikes again on the + of 3 and the e of 4.
Sixteenth Notes
But wait, what’s an “e”? Well, this is part of the way we count sixteenth notes. So, if I were to count sixteenth notes all the way through a measure, I’d say “1e+a, 2e+a, 3e+a, 4e+a.” Each of those counts is a sixteenth note. Two sixteenth notes fit into the same amount of time as 1 eighth note. And, because 2 eighth notes fit into the same amount of time as 1 quarter note, 4 sixteenth notes fit into the same amount of time as a quarter note.
So, back to the beat, my hihat is playing all sixteenth notes and I open the hats on the e and the a of the 2nd quarter note. Last, I’m hitting the snare drum on the 2nd quarter note, on the e of the 3rd quarter note, on the 4th quarter note, and on the a of the 4th quarter note.
I notice a lot of great drummers who tend to play in a very small area of their drum set. What I mean is, they may be a monster drummer, but they focus all of their attention on the left side of their set and play only the hihat, snare, and bass drum. This isn’t necessarily a problem, because in many styles of music we drummers tend to keep time on the hihats and don’t need to move around the rest of the set much. But, at the same time, there is so much real estate around the set, so if you can get used to playing freely in the rest of that space then you’ll open up so many great possibilities. Plus, moving around your set a quickly provides an inherent visual effect that makes you a more interesting drummer to watch from the audience.
With that in mind, the exercises we’re covering today will help you develop the ability to effectively move around your set. These exercises will:
Enhance your balance and agility as you move from left to right (and vise versa);
They will improve your speed as you increase the tempo;
And, they will increase your hand and wrist strength in both hands because you’ll be playing on your toms and cymbals, which offer varying degrees of rebound and therefore force you to lift the stick off the drum head.
These exercises will also be useful for drummers who have trouble playing with their weak hands – they will really help you overcome your imbalances.
Example 1
In the first exercise I play eighth note triplet singles. I play the first stroke of each triplet on either the floor tom to my right or the floor tom to my left. If you don’t have a floor tom on your left – don’t worry – you can use your hihat instead. Once you get comfortable, you can begin to move the accents around your set like I do in the video.
Just because this is a fairly simple exercise on paper, that doesn’t mean it will be easy. I still find it to be a great exercise for building my grip, testing my endurance and perfecting my accuracy – particularly at higher tempos, but even at low ones too.
Example 2
The next exercise follows the same idea, except this time we’re going to play paradiddles and move the first stroke of each paradiddle around the set. I begin by playing the accents on my floor toms and then I move them around the rest of the set.
Example 3
This last exercise is great fun and it will really limber you up as you start moving around your set. It incorporates cross sticking, which is a technique in which you cross one of your hands over the other as you play. Cross sticking is an awesome visual effect, but sometimes it can also be the most effective way to get from point A to point B as you’re playing.
All we’re doing here is playing alternating singles, so you can move them around the drums however you want after you become comfortable with the pattern. The basic sticking for this exercise is as follows.
I hope you all enjoyed this lesson. As with all things drumming-related, the possibilities are endless, so don’t be afraid to experiment. Once you understand the concept, you can create your own exercises, which can also be used as fills or patterns in your normal playing. Remember, practice exercises don’t have to remain rigid practice exercises. Instead, they can be used in your real playing however you want. Last, I’ll come back to this topic in future videos too, so if you enjoyed this video please stay tuned.
In this lesson I discuss a fun and valuable practice concept I like to call “Mirroring.” This concept is a lot like “Call and Response”, which essentially is when two musicians take turns playing musical phrases that interact with one another. First, one musician plays a melody or a rhythm and then another musician plays the same thing or something similar that goes along with it. This interplay can go back and forth for a while as the musicians improvise – or it can be a one time thing.
You may never have considered it, but this concept can also be applied to the drums. And, one of the most interesting ways we can apply it is by using our limbs to “call” back and forth to one another. You can do this with any pair of limbs, but I most often do so between my hands and feet. This is most natural for me and I find that it’s also very effective musically.
Example 1
I start by playing a funky rock beat in 4/4 time. In the fourth measure, I play a fill that incorporates flurries of 32nd notes that I begin on the snare and rack toms and then move down to my feet on the bass drum. Next, I play another three measures before I begin a triplet-based fill that starts on the third count of the third measure. Again, I purposefully play back and forth between my hands and feet – first between the snare and bass drum and then between the floor tom and bass drum.
Alright, so what if your feet aren’t quite up to the same ability level as your hands? No problem. There are plenty of cool things you can do with mirroring. And, simply by playing around with this idea, you’ll be surprised by how fast your feet tend to pick up the pace.
Example 2
This example is a little more manageable if you’re not used to playing with your feet. I hear fills like this all the time. Although it may not seem like anything special, once you get used to it and can speed it up, it becomes a great fill for hard rock or heavy metal. It’s also a great example of mirroring because your feet are copying what your hands play exactly. As you can see in the notation below, I play four 16th notes with my hands, followed by four 16th notes with my feet. Then, I repeat that pattern back and forth for the whole fill (see the 4th and 8th measures).
Example 3
In addition to being fun for fills, mirroring can also be a great way to practice improving your double bass drum technique. I see a lot of people who practice their foot technique by playing long drawn out patterns with their feet. Although there’s nothing wrong with that approach, it can get boring. Instead, playing patterns back and forth between your hands and feet can be a great way to mix things up and reduce the monotony.
For example. say you want to practice your rudiments. Well, why not try playing them with your hands and your feet! The next time you work on your flam taps, give them a try on the bass drum!
You don’t have to think too much about what you’re playing. Instead, just have fun with the ideas that pop into your head. Much of the time, I like to turn on music, a loop, or a metronome and solo over top playing ideas back and forth between my hands and feet. This is a great way to get comfortable with everything while letting your creativity run wild. Ultimately, this approach will help if you want to use this concept in a live solo in the future, because you’ll already be primed to improvise.
I hope you all enjoyed this video. Mirroring is lots of fun and is a great way to quickly improve your hand and foot technique at the same time. The possibilities are endless, so don’t be afraid to experiment.
This is a lesson for “Mind-Spun” by Animals as Leaders. You can follow along with my notation, available on the Transcriptions page.
VIDEO INDEX:
1:23 – Section A: Intro Groove
3:40 – Section B: Intro Groove Continued
5:12 – Section C: Measures in 11/8, 13/8, and 5/4
8:47 – Section E: The Second Set of Measures in 11/8, 13/8 and 5/4
9:45 – Section D: 7/8 Groove with Heavy Ghosting
11:02 – Sections G & H: Measures in 7/4
12:39 – Section K&L: THE DRUM SOLO